|
Using the InterpolatorsInterpolators provided by this package are different to the interpolators that you find in the standard Java 3D libraries. Where those interpolators are only available as Java3D behaviors, these interpolators are completely standalone. They just require you to pass in a key value and you will get the interpolated value back.PhilosophyOne complaint, particularly in the early Java 3D days, was the ability to separate the interpolator code from the java 3D behavior. The intention of these interpolators is to provide a set of easy to use interpolation routines without the need to bring the rest of the Java 3D system along with it.All interpolators use a simple base class that represents the generic interfaces available. On top of this is built the real interpolator code to deal with the specific data types.
UsingThis section will discuss how to use the interpolator classes found in the org.j3d.util.interpolator package.Setup of valuesTo do interpolation, you need to have a set of values to work with. As these interpolators all provide linear values, you need to set a collection of keys and corresponding values. Internally the interpolator will then sort the keys in ascending order for use.For performance reasons, we suggest that you make use of the constructor that provides an initial indication of size. This means that we don't need to keep re-allocating the internal arrays - which generates garbage and is very slow.
To insert new values into the interpolator, each interpolator has an
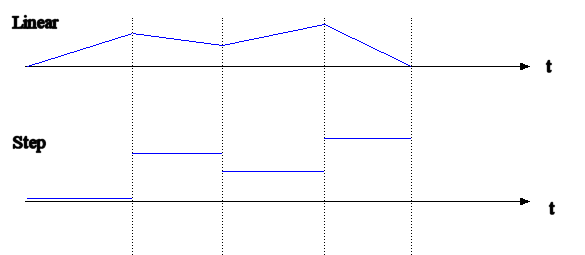
Taking the stepsWhen dealing with interpolators, we've provided an interesting extra capability: All interpolators are capable of acting as either a linear or step fashion. Linear interpolation is your usual system of morphing between points. Step interpolation will just use the value of the point that has the key value less than the current point. The effect is shown in figure 1.
 Figure 1: The difference between linear and stepped interpolators To set this up, you need to specify it at creation time of the interpolator. The value is an integer constant defined in the Interpolator base class. You may wish to check out the actual interpolator for more types that are possible to use. Interpolator = new ScalarInterpolator(20, Interpolator.STEP);will create an interpolator with 20 keys pre-allocated and will use the step interpolation routines. Asking for interpolated valuesPerforming interpolation is simply a matter of calling one of thexValue() methods. The first part of the method name will indicate
the type of value that is being created. If we have a scalar interpolator then
floatValue() will return the interpolated value as a
float.
If you provide a key value that is outside of the set range of the interpolator it will clamp it to the appropriate end value. That is, if you provide a key smaller than the lowest key it will return the value of that lowest key. Color interpolationThe ColorInterpolator class allows you to perform interpolation in either RGB or HSV space. When dealing with HSV space you have to be very careful to protect against colors that are monochromatic. With this routine it is impossible to build values in HSV space and internally it protects against this by throwing exceptions when this condition occurs. |
|
[ Home ]
[ License ]
[ javadoc ]
[ Online Examples ]
[ Download ]
[ j3d.org ] [ Aviatrix3D ] [ Code Repository ] [ Java3D ] [ OpenGL ] [ Books ] [ Contact Us ] Last Updated: $Date: 2010-01-27 21:36:00 -0800 (Wed, 27 Jan 2010) $ |